Friday, March 11, 2016

Weather Station 3: Crontab, ffmpeg & Youtube

Some things are up and running. You can check out the pictures and temp data here, but you might only see pictures of my apartment and the temp data is being wonky. All things to fix!

With the hardware complete, I need to wrap up the loose ends with software.

This is what needed to be done:

  1. Schedule all the tasks
    1. Take pictures every 10 seconds
    2. Make a video from those pictures once a day
    3. Clean up and reset for next day
    4. Shut down pi at 10pm and reboot at 5am
  2. Make the video - I'm using ffmpeg
  3. Upload that video to youtube
Clearly some of these overlap, but I decided to figure out Crontab first so I can get the pictures scheduled.

Crontab

You can schedule scripts in linux using crontab. There are countless tutorials online showing you how to do this. Before scheduling anything, be sure to run your script from your home directory as that is where cron starts looking. If you call many other files in your script (as I was doing) be sure to use ABSOLUTE PATHS! Your script will not work if you are using relative paths and your working directory is not home.


Test in home directory:


$ cd /home

$ python /home/pi/Documents/WeatherProject/MainScript.py

If that doesn't work, cron will not work. Fix issues here!

Scheduling in crontab

To open the crontab document, type the following command:

$ crontab -e

You should see a bunch of comments followed by blank space. In the blank space add the following line:

SHELL = /bin/bash

This makes cron interpret your commands as if you were typing them into the bash shell like normal.

Next, schedule the task.

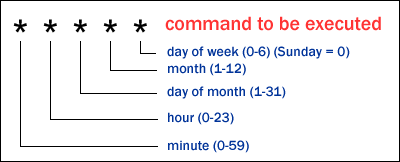
* 5-21 * * * python /home/pi/Documents/WeatherProject/MainScript.py

The normal bash command comes after the asterisks, the asterisks are a sort of clock.
The above command would run every minute of every hour between 5am and 10pm, not including 10pm.

This is how I scheduled the photos, sensor read and uploading to dropbox and google sheets.

As for cleanup, I'm planning on resetting the image number (currently stored, read and updated in a text file), make the video and then delete the day's images. Will post code when it's all working.

I haven't yet scheduled the cleanup or video stuff. I still have to figure out ffmpeg.

ffmpeg

I followed this tutorial to install ffmpeg. It takes a while.

I also followed this explanation for how to use ffmpeg to make a timelapse video from jpg files. It hasn't worked yet, but I'm trying to reinstall then i'll try a few more things. Will update once it works.

Youtube

So I anticipate this being the hardest portion. Once I have ffmpeg working i'll work through this support page from google. One of the changes google made to its API is to have a central developer account so that, theoretically, all of the google apis get routed through the same thing. This ideally will make things easier for me since I already have the oauth2 information in that json file, but I can't really say until its all working. Will update soon!

Weather Station 2: Hardware

I got all the hardware!!! I'm so excited to show this! It came out really well.
Before I get into the nitty gritty of soldering and circuitry... some software stuff changed since I last posted. First, I had to stop using timestamps as the image file names. This is because I am using ffmpeg to make the videos and it expects names like image001, image002 etc. Second, I decided only to upload one image to dropbox and call it current_image.jpg. This ends up working better because then I don't need any fancy javascript on the website end to show the most recent photo. This is what I have so far for the site. So now onto the fun stuff...

Hardware

I followed a portion of the tutorial here, however they fail to mention that you need an additional JST connector, so add that to the shopping list. Here are some pics of the modules and soldering jobs (mostly terrible).
Charger module (best soldering job for this project)
Power Booster (terrible soldering job!)

Solar panel connected to charger module, connected to lithium ion battery


With everything connected:
The finished product!
The charger module does double duty charging the lithium ion battery and dispensing that charge to the booster module. The booster is then plugged into the pi. It all works too!

One part that I totally messed up was the DHT22. I tried to solder the connections together, but did such a terrible job that the connection goes in and out. I have to go back and fix it.
10k ohm resistor between pins 1 and 2

Camera and sensor embedded in tupperware
In order to seal the tupperware from water, I used caulk and hot glue to seal around the DHT22 sensor and around the cable connecting the charging module to the solar panel.
No seal on the cord
Hot glue and caulk to seal the hole

Everything would seem to be working!
Hand held, solar powered computer!!
Hardware complete! I haven't tested how long the charge lasts or how well it charges in cloudy weather.

Now to finish the software portion...

Monday, February 29, 2016

Weather Station

I decided to pick this project up again after it got interrupted by my move to San Francisco. I have a couple weeks between jobs and thought I could get this working in that time frame.
The goal is to make a solar powered Raspberry Pi weather station with accompanying website (available here). The weather station would take a picture of the view from the roof of my apartment building every 10 seconds, posting that picture on the website. Additionally a temperature and humidity sensor would take data and store it on google spreadsheets at the same rate. A graph of this would be visible on the website. At night the Pi would take all the pictures and make a timelapse video of the day, upload that to youtube and that video would display on the front page of the website.
 A lot to promise!

Today's post is a bit dry as it is entirely code, but if you are interested in doing something similar yourself, it will be useful.

As of today, I have code that can...
  • take data from the temperature and humidity sensor (Available Here)
  • write data to google spreadsheets
  • take a picture with the picamera
  • store that picture on dropbox

I am working on writing code to...

  • take a set of jpeg images and create a .mov (hopefully using ffmpeg)
  • upload that .mov to youtube
  • managing the images (will delete each day's pictures from local storage)
  • schedule everything using crontab

I will get to writing the code for...

  • the entire website
  • managing dropbox's images (I would run out of space in about 10 days without managing storage).


So I'll start by documenting what I have done.


Interfacing With The DHT22 Sensor

This took a lot of trial and error. I ended up finding this tutorial and, while the website looks ridiculous, it worked like a charm!

Bash commands / packages to install:

sudo apt-get install git
cd ~
git clone https://github.com/adafruit/Adafruit_Python_DHT.git
cd Adafruit_Python_DHT
sudo apt-get update
sudo apt-get install build-essential python-dev
sudo python setup.py install


Python code:

import Adafruit_DHT as dht 
import datetime 
h,t = dht.read_retry(dht.DHT22, 4)


Writing Data To Google Sheets

First, create a spreasheet where your data will sit. Delete all but one row (there are only 1000 rows so if you delete rows 2-1000 you will be left with only the first row).

Next is a bit tricky because while Google updates its APIs regularly it doesn't, apparently, always keep its documentation up to date. I followed google's own documentation (found here), but ran into problems. Two hours later, I found the solution here.

So, if you are doing this yourself, follow the google tutorial, just replace the python in step 6 with what I have below (with certain things replaced to refer to your own project, of course).

Bash commands / packages to install:

pip install PyOpenSSL pip install --upgrade oauth2client

Python code:

import json
import gspread from oauth2client.service_account 
import ServiceAccountCredentials 

#The following refers to the json file created by google. It must be placed in the same directory as this script.

json_key = 'WeatherStation-41a4ca0f181e.json' #replace with your own

scope = ['https://spreadsheets.google.com/feeds']

#this service account credentials part was what was not documented.
credentials = ServiceAccountCredentials.from_json_keyfile_name(json_key, scope)

gc = gspread.authorize(credentials)
sht = gc.open('WeatherStationData') #the name of the spreadsheet
wrksht = sht.worksheet('Sheet1') #the name of the worksheet

wrksht.append_row([datetime.datetime.now(), t, h]) #append the data


Picamera

This is well documented and easy to use. All information can be found here.
I chose to use the date and time as the file name for a couple of reasons. One is that the pictures have a lot to do with time, so if I ever need to find one taken at a particular time, I search by file name. The other reason is that the date and time is always unique so I know I won't have any file naming errors.
However, if you do use datetime.datetime.now() you have to do two things:

  1. Change the date and time of your pi to local time from Universal Time (for your convenience and sanity)
  2. Replace all strange characters like ':' with '_' so you make sure you know the naming format
I did a little more with naming and replaced all non-numeric characters with '_' and removed the sub-second digits as they were not necessary for this project.

Bash commands / packages to install:


Enable picamera
sudo raspi-config


Change date and time
sudo dpkg-reconfigure tzdata


Install picam library
sudo apt-get update
sudo apt-get install python-picamera


Note: This is for python 2.7. If you want to use python 3, read the tutorial.


Python code:

import picamera 
import datetime 

#define filename as year_month_day_hour_minute_second.jpg
temp = str(datetime.datetime.now()) 
print temp file_name = '' 
for char in temp: 
     if char == ":" or char == "-" or char == " ": #want to replace all with '_'
          file_name += "_" 
     elif char == ".": #exclude fractional seconds
          break
     else: file_name += char
file_name += ".jpg" 

#take picture 
camera = picamera.PiCamera() 
camera.capture(file_name)


Storing Picture on Dropbox

This takes a little extra than just the dropbox api. This tutorial walks you through the entire procedure in painful detail. So painful, in fact, that I won't rehash it here.

Bash commands / packages to install:


Read the tutorial!

Python code:

from subprocess import call
photofile = "/home/pi/Documents/weatherprojects/Dropbox-Uploader/dropbox_uploader.sh upload /home/pi/Documents/weatherprojects/{} {}".format(file_name, file_name) 
call ([photofile], shell=True)


That's all for now!
Thursday, January 14, 2016

Iron Pipe Shelves


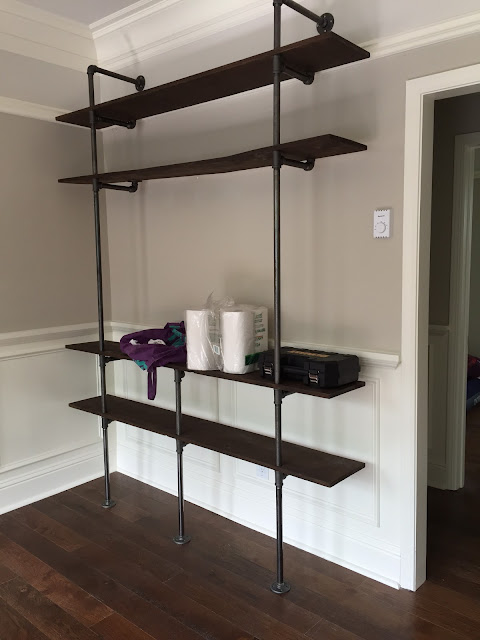
This one was fun! My husband and I moved to San Francisco back in July 2015. We got our current apartment in August and it was a major downsize from our place in Chicago. It has a grand total of 450 square feet and very little closet space. Since I have so much craft stuff, I really needed a place to store it all (I was definitely not about to throw it all out!!!) I started looking on Pinterest for inspiration and came across a ton of posts of industrial shelves made using cast iron piping.
My main inspiration was this picture below:
I decided to also make it a media stand. This way it could house the tv, speakers, receiver and all my craft stuff!
Here is the finished product (on the right):

I took a ton of pictures of me making it, but I seem to have lost them in transferring to dropbox from my phone. EDIT: My mom found some that I sent her!!!
Here is an overview of my process:
Planning out the footprint
building it from the bottom up!
  1. Find the studs. This shelving unit is only secured on the top so it needs to be very secure. I got a stud finder and marked out the studs on the wall.
  2. Map it all out. I decided to have two large shelves on the bottom for craft storage then two smaller shelves on the top for displaying knickknacks and books. I kept the middle for the TV and speakers (although it was only by sheer luck that the speakers fit!)
  3. Buy the pipes. I got 3/4 inch pipes because they were cheaper than the 1 inch. I think it looks good. One thing I didn't totally anticipate was that the shelf spacing is actually longer than the pipe length. This is because the joining pieces have some height to them. Keep this in mind when deciding which pipes to buy. Also note that there are supports underneath each shelf. It is easier to see on the upper shelves. I also added a middle support on the bottom. This is because I put a TV in the middle and thought it should have an additional support.
  4. Drill holes in the shelves. These holes need to be mapped with the studs in mind. This is where the pipe will be threaded through.
    The wood all stained
  5. Cut, sand, stain and finish the shelves. If I were to do it again, I would have bought thicker wood. I think 2inch would have given a nice chunky look to the unit. I do like the dark stain I chose. It really fits with the rest of the apartment.
  6. Build from the bottom up. It isn't very stable at first, but it comes together at the end. Have patience!
  7. At first, I didn't have the top shelf, but it didn't look right
With the top shelf

Anyway, I really like the shelves (even though one of them is a little warped). We definitely would have been swimming in yarn if I hadn't built it!