With the hardware complete, I need to wrap up the loose ends with software.
This is what needed to be done:
- Schedule all the tasks
- Take pictures every 10 seconds
- Make a video from those pictures once a day
- Clean up and reset for next day
- Shut down pi at 10pm and reboot at 5am
- Make the video - I'm using ffmpeg
- Upload that video to youtube
Crontab
You can schedule scripts in linux using crontab. There are countless tutorials online showing you how to do this. Before scheduling anything, be sure to run your script from your home directory as that is where cron starts looking. If you call many other files in your script (as I was doing) be sure to use ABSOLUTE PATHS! Your script will not work if you are using relative paths and your working directory is not home.
Test in home directory:
$ cd /home
$ python /home/pi/Documents/WeatherProject/MainScript.py
If that doesn't work, cron will not work. Fix issues here!
Scheduling in crontab
To open the crontab document, type the following command:
$ crontab -e
You should see a bunch of comments followed by blank space. In the blank space add the following line:
SHELL = /bin/bash
This makes cron interpret your commands as if you were typing them into the bash shell like normal.
Next, schedule the task.
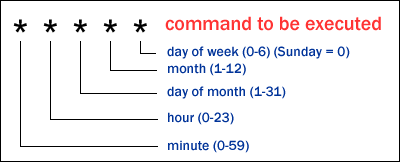
* 5-21 * * * python /home/pi/Documents/WeatherProject/MainScript.py
The normal bash command comes after the asterisks, the asterisks are a sort of clock.
The above command would run every minute of every hour between 5am and 10pm, not including 10pm.
This is how I scheduled the photos, sensor read and uploading to dropbox and google sheets.
As for cleanup, I'm planning on resetting the image number (currently stored, read and updated in a text file), make the video and then delete the day's images. Will post code when it's all working.
I haven't yet scheduled the cleanup or video stuff. I still have to figure out ffmpeg.
ffmpeg
I followed this tutorial to install ffmpeg. It takes a while.
I also followed this explanation for how to use ffmpeg to make a timelapse video from jpg files. It hasn't worked yet, but I'm trying to reinstall then i'll try a few more things. Will update once it works.
Youtube
So I anticipate this being the hardest portion. Once I have ffmpeg working i'll work through this support page from google. One of the changes google made to its API is to have a central developer account so that, theoretically, all of the google apis get routed through the same thing. This ideally will make things easier for me since I already have the oauth2 information in that json file, but I can't really say until its all working. Will update soon!


