Friday, December 18, 2015

3D printed food mold

More on this 3D printing kick...

I have been assistant coaching the math team at my school for the past year and a half and found out that our team has an unofficial mascot: Metoo!
Metoo is a Malasian toy line that has everything from plush toys to pencil cases and backpacks!

Anyways, I set out on an interesting mission. I wanted to make a jello cake in the shape of metoo. I did try to redesign metoo on sketchup, but it wasn't looking right. I could probably do it in tinkercad now that I have more experience, but whatever. I decided that in order to look exactly right, I would have to 3d scan metoo.

Makerbot Digitizer:
A colleague of mine in the science department at my school has a makerbot digitizer. He has never successfully used it and I am pretty sure I know why. The makerbot digitizer is an optical 3d scanner that relies on offset lasers and an optical camera to create the 3d image of your object. This means that the scanner is highly sensitive to light. The scanner should be operated in a well lit environment with NO CHANGES to the lighting. Here was my first attempt at scanning:
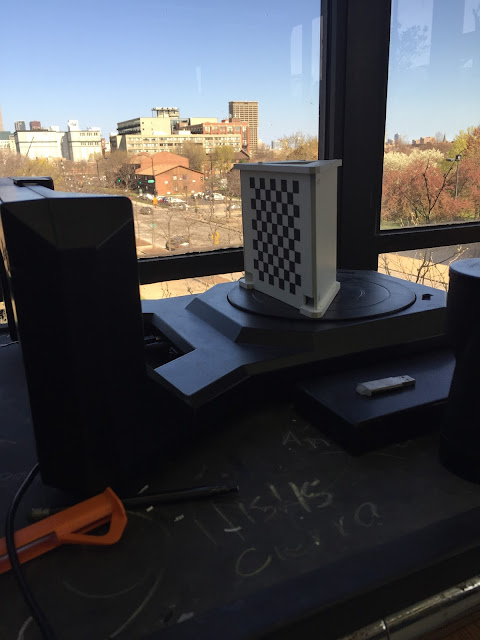
Beautiful view, not good for scanning

This turned out horribly
So, I learned my lesson. This scan looked like a hot mess. My second line of attack was to "borrow" the 3d scanner and take it to a more stable location. The second scan was significantly better, but with the setting sun coming through the windows, I still had the odd random blob show up in the final scan. So I tried another method.

Kinect:
I coach the robotics team at my school and we somehow managed to get at X-Box Kinect as a donation. I found it down in our robot room and brought it up to the computer lab. The scans on skanect were awesome! However, the premium version of the software is both necessary to edit/export and extremely expensive. I looked at a few other pieces of software but ended up abandoning this path as well.

With no other way forward, I went back to the makerbot digitizer. I came in before school, scanned the image with minimal changes in light and it came out ok.  The metoo was slightly deformed, but ok.
The deformed metoo scan
I had wanted to edit the metoo scan so that he didn't print all deformed, but I couldn't find a good way to get at the file. For being at the center of the maker movement, makerbot is not very tinker friendly. I would really appreciate some more openness to their software.

After finally getting a scan I could use, I printed it! I fixed up the strange bits with some tape so at least the mold would turn out well.

I got some food grade silicone for molding. I had to kneed it for a few minutes to mix the two putties. Then I pressed it around the rabbit. I was a little worried that the silicone wouldn't hold its form, but that stuff was STRONG!

Waiting for the silicone to harden

With the bunny model removed
When I removed the rabbit I nearly broke off the ears! also, there were some holes in the bottom, but that didn't turn out to be a huge issue.

Now for the final step! White Chocolate Bunny Time!

Melting the chocolate

greasing up the mold

Pouring the molten deliciousness

Waiting for the chocolate to cool
All done!
I have definitely learned a lot from this experience. If I did it again, I wouldn't push the silicone so high up the sides of the model. It made getting the chocolate out very difficult.
Hope you enjoyed!


Tuesday, June 16, 2015

Seifert Surface 3D Print

Seifert Surface on Trefoil

Today's adventure is printing a Seifert surface on a trefoil knot! I'm sure you all know what that is (\sarcasm) If you want to know more about this surface, there is an explanation at the end.

When I was a first year in college, I did an independent study on knot theory and really loved it. For that project I made a model of Seifert surfaces on both a trefoil and figure 8 knot out of a wire hanger and panty hose. I wish I still had a picture. I have always wanted to carve a larger, more sturdy version out of wood, as a tiered cupcake stand. I got one step closer to this goal today; I 3D printed the thing!

When I read this post by Laura Taalman and Jonathan Gerhard, I realized I too could 3D print these surfaces! Laura and Jonathan used a wonderful program called SeifertView to model the surface of their knot. I downloaded it and got it running on my mac through wine bottler.  This program is so much fun! Check out some screen shots:

Trefoil Surface in SeifertView
Close Up
Laura and Jonathan did get a special version that would export to stl (although I only ever got it to export to .obj) in order to 3d print the surface. Clearly I needed this special version of SeifertView as the original doesn't have many export options. So, without ever meeting either of them, I emailed Jonathan (thinking it was Laura, I guess I didn't read the post that closely) and asked for it. He responded within a few hours! 

I then followed the suggestions from Jonathan and brought the .obj file into blender, and thickened the mesh using the solidify tool (here is an awesome tutorial on the tool) and exported as .stl.

Blender


From there I imported into makerware and printed! (thingiverse)
In Makerbot Makerware
Printing with rafts and supports. 0.3mm, 10% infill
Final Product! Would print at 0.2mm next time


About the Surface:
A knot in mathematics is not so much like the knot you tie on your shoe laces, rather it resembles more the knots of celtic art work. In fancy terms, a knot is an embedding of a loop in 3 dimensional space. An "untied" knot is just a circle. The simplest knot you can make is the trefoil. Here is a drawing of one:
Trefoil Knot
A knot surface is a surface whose boundary, or edge, is a knot. So for the unknot (or circle) the knot surface is a disk. The interesting question here is, what would a surface look like if its boundary were a knot. One option for a surface whose boundary is the trefoil knot is a strip with three half twists (pictured below).
Surface on Trefoil
The problem with this surface is that it has only one side! If you were an ant, placed on this strip, you could walk in a straight line and eventually end up under where you started without ever crossing the edge. See Vi Hart's video for more explanation.

The question remains: does every knot bound a surface that has two sides? Herbert Seifert found a solution to this problem. He devised an algorithm that would define a two-sided (orientable) surface on any knot!

The culmination of this one quarter was proving that the Seifert surface on a trefoil knot is isomorphic to a punctured torus. It would be really cool if I could somehow print the steps in the dissection proof... A project for another day.
Punctured Torus


Friday, June 12, 2015

The Trials and Tribulations of 3d Printing

It has been a while since I posted. I have been trying to get this weather box off the ground, but keep running into issues with the 3d printing! My colleague and I have a Makerbot Replicator, 5th generation for the Computer Science department. The "smart" extruder keeps getting blocked! It's been quite the journey with this thing.
Makerbot Smart Extruder

I managed to get a piece of the box printed (I am going for a modular design, tinkercad link here, thingaverse link to come).
The raspberry pi fits nicely!

Temperature and humidity sensor fits in the side. Wires feed into interior through the top

You can see the ribbon leading to the raspi camera. Also the wires on the right leading to the temp sensor.

The makerbot refused to print after this though, partially because we tore off some of the heater block insulation when trying to unclog the extruder. You can see the result of this on the above pictures. There are large, chunky imperfections in the print that happens when the temperature is not stable. So I ordered some kapon tape and ceramic insulation to re-insulate the block. Got to it today!
I decided to insulate a bit more than it was originally. The block still moves freely in the cage (which is super important because the smart extruder has a sensor that tells when the build plate has touched the print head).  I haven't tried to print with this yet as we somehow managed to lose the set screws that hold the thermocouple and heat sensor in place. Should have replacements by Monday though.

Meanwhile, our school's science department has two of the same makerbots and has been experiencing similar problems. They even ordered two replacement extruders, just to have them clog on the first print! We managed to convince them to give us one of their machines and all of their print heads to try to fix them. Less than a day with them and I got two of the extruders working! Without even taking them apart! Used the general idea from this video to unclog them. It didn't work 100%, I had to take the extruder off and shove the filament through with the catching clasp open (spring loaded tabs that stick out the side) to get one of the clogs out.  Just to make sure the extruders were really working I printed these:
Tetrakis Hexahedron and Rocking Trefoil Knot
Thanks Math Grrl for the designs! (thingiverse link)

While I did get two print heads working, I managed to shear off the tip trying to screw it into the heat block. Not sure how I'm going to fix this one.... I will let you know.

Perhaps I have been doing too much crossfit...
The last smart extruder had already been taken apart. The teacher who did it managed to break all but one of the clasps! I took it apart again because it was having trouble catching the filament. I think it might work now. I didn't get a chance to check it. Will try on Monday. 2 out of 4 is pretty good for one day.


I thought this might be a good teaching moment. This is the partial tear down of the smart extruder. the silver mass on the left is still together. It is the heat block, heat sink, cage and print head. The colored wires connecting to the circuit board lead to the heat sensor while the (difficult to see) black wires attach to the thermocouple. The steel cylinder is the gear that feeds the filament down into the heat block. The spring loaded plastic piece in the middle is the filament clasp.  Sometimes your filament will make it into this clasp, but won't be caught by the loading gear. If this happens, I recommend taking the extruder off while hot (be careful not to touch the heat sink or the heater block as they are obviously very very hot), open the clasp by squeezing the tabs on the sides and shoving the filament in. I did this today and it totally cleared the blockage. There are a few more pieces to this extruder, but they are hard to see here.

Monday, May 11, 2015

Weather Box

This will be an ongoing post...
This is my first year teaching. I teach at Whitney Young High School in Chicago. We are located directly west of the Willis Tower (formerly Sears Tower). At the beginning of the year, I would get to work extremely early and had breathtaking views of the sunrise from the school's bridge over Jackson Avenue.


Fast forward a few months....
I can no longer get myself out of bed early enough to see the sunrise and I just attended this great workshop on raspberry pi's. Together this idea emerged: My advanced CS students are going to program a raspberry pi to take a timelapse of the sunrise every day for a week. Additionally they will collect temperature and humidity data and have all of this hosted on a website. If this reminds you of NASA's Astronomy Picture of The Day a few years back, good for you! I am loosely basing the project on this. I like the idea of the temperature and humidity data being mapped out along with the physical images of the sunrise.

Anyway, back to the project. I have two groups of students working on this. The roles are split up as so:
1. One person will design a housing for the Raspberry Pi in Google Sketchup and 3d print it on a Makerbot Replicator. The purpose of the box is threefold. First it has to keep out rain so we will likely seal it with polyurethane or cover the roof in plastic wrap. The walls should let some air through otherwise the temperature and humidity data wouldn't be accurate. Second, it must hold the camera in the same position throughout the week, above the small lip on the edge of the roof.
2. A second person will be in charge of programming the time lapse. It should begin every day at a certain time and end at a certain time. I had toyed with the idea of using a photo resistor to trigger the time lapse, but that might be too complicated and I like the idea of them seeing the sun rising earlier and earlier each day.
3. A third person will be in charge of the temperature and humidity sensing program. The data will be collected every minute and stored in a google spreadsheet. This data collection will be ongoing, not limited to sunrise.
4. A fourth person will create a website to display all of this information. I would like the sunrise timelapse to show as the sun is rising, then when it shuts off, be processed into a video and uploaded to youtube. This might require another person... The youtube video will be embedded on the website along with a real time graph of the temperature and humidity data.

Here are the materials we are using:
1. Raspberry Pi
2. Raspberry Pi Camera
3. Temperature and Humidity Sensor - I had considered getting something more outdoor-friendly, but I couldn't find anything. Recommendations anyone?

I'll let you all know how it goes! Gotta go talk to the engineers about getting on the roof.
Bye!

Tuesday, May 5, 2015

Basket Weaving

This is a project from last summer - I wove a picnic basket for my brother and his wife for their wedding. The lining is custom printed fabric with a picture of their two dogs. It is also hand quilted with a heavy canvas on the other side for durability. The handles are custom bent to size (since my basket was not a standard size, surprise surprise).
Original Sketch

Paper trial
After watching a few videos on how to do a box weave I dove right in! Got all supplies from amazon. I had difficulty keeping the sides straight. I definitely didn't have the tension 100% right. It all turned out well in the end though.
Starting to weave
I found some pictures of my brother's dogs and used it to design fabric on Spoonflower.
Spoonflower design site
It finally came! I was so excited to quilt that I didn't take a picture of it in the box, but here it is all quilted.
Custom printed fabric post quilting
I quilted the fabric backed with canvas for durability. The fabric from Spoonflower was fairly thin.
Finished project without handles

Inside without handles


Frisbee for scale


Doggy for scale
Steam box for bending the wood

I wouldn't recommend bending wood using a PVC steam box. The PVC started bending as it heated up. We had to turn it periodically to keep it straight.

Bending the handles
And the finished product:


First Post - Etched Wine Glasses

I recently got a Silhouette Studio paper cutter and one of the coolest things I have experimented with so far is etching glass. I have made a few custom beer steins, but since my family is celebrating two birthdays this weekend I thought I would make some commemorative wine glasses!
The design here represents the year (2015), my sister's age (30) and my mom's age (60). Our family is Irish so I added some celtic knot pictures I found on the internet. Here is a photo of the final design on the Silhouette Studio software:
I used the trace function to get the knots, and subtraction to interlace the numerals.

Here is what the sticker looked like after cutting and removing the important pieces.

I had anticipated this problem... Flat stickers do not like to behave on round surfaces. It is important when you are etching (or painting, or stenciling at all) that your stencil adheres cleanly to the glass, no bubbles or folds. Can't really avoid that on a sphere though! I managed to figure out a good application (after 3 or 4 tries). The key is to get the inevitable folds not to intersect the negative space that you will be etching.

Additionally, I wanted to decorate the base of the glass. The rose curve on there has 5 loops so this glass is for my sister, the 5th oldest in the family (including mom and dad).

I managed to make 5 last night, though I will probably have to redo a few. 9 more to go!